
Yes, a sample can help you assess a shirt before organizing a larger order. Samples may involve additional fees and production and shipping lead time. For high-visibility work shirts with a custom logo, review the garment’s fit, colour and fabric, along with how the design looks on it.
That’s a practical step when ordering for a team. Shirt styles and decoration methods affect the finished look and any minimum order quantity. Plan where names and logos should appear before choosing printing or embroidery.
This guide explains what to consider when requesting a sample, how minimum order quantities can vary, and how names and logos can be printed or embroidered. You’ll also learn how to match the garment and decoration to your team’s needs before placing an order.
Key Takeaways
- Compare the minimum order quantity with your team’s size and the shirt style before choosing a print bundle.
- Plan for sample production and shipping time, and consider any additional sample fees when setting your order schedule.
- Choose logo colours and placement that remain easy to see against the garment’s colour and reflective areas.
- Match the decoration method to your design and order size; printing and embroidery suit different needs.
- Review the available shirt categories and decoration options to narrow down what will work for your team.
Minimum order quantities
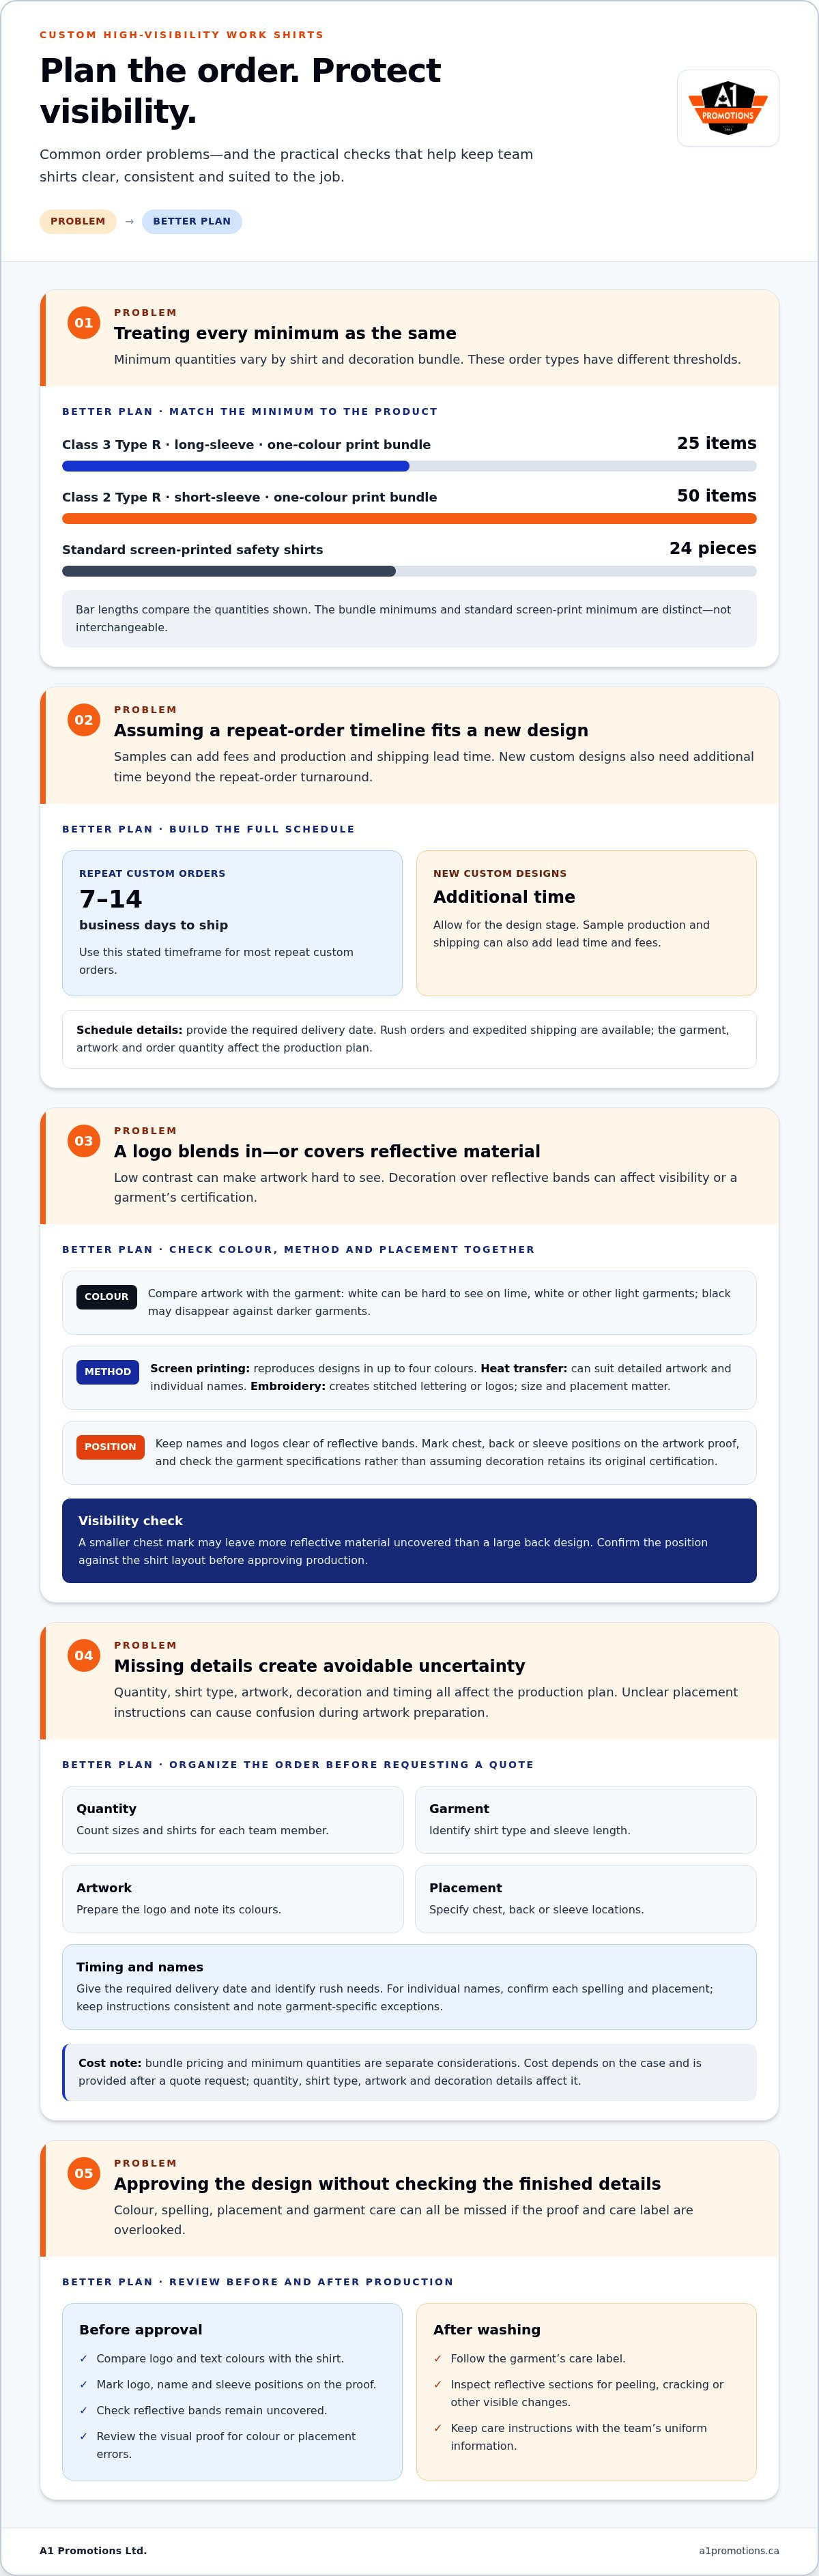
For custom hi-vis shirts in Canada, stated minimums depend on the shirt and decoration bundle: 25 items for a Class 3 Type R long-sleeve, one-colour print bundle, and 50 items for a Class 2 Type R short-sleeve, one-colour print bundle. A standard minimum for screen-printed safety shirts is 24 pieces. Most repeat custom orders ship within 7-14 business days.
New custom designs need additional time beyond the repeat-order turnaround. Rush orders and expedited shipping are available, so include your required delivery date when planning the order. The garment, logo artwork and order quantity all affect the production plan.
For a practical look at branding reflective workwear, watch this tutorial:
Use the minimum that matches your chosen product, rather than applying one quantity to every shirt. For example, a team considering a Class 3 Type R long-sleeve bundle should plan for at least 25 items. A Class 2 Type R short-sleeve bundle has a 50-item minimum. The standard screen-printed safety-shirt minimum is 24 pieces. These are distinct order types, not interchangeable thresholds.
Before requesting a quote, organize the order details:
- Quantity: Count sizes and shirts for each team member.
- Garment: Identify the shirt type and sleeve length.
- Artwork: Prepare the logo and note its colours.
- Placement: Specify the intended chest, back or sleeve location.
- Timing: Give the required delivery date and identify any rush needs.
Clear placement instructions help avoid confusion during artwork preparation. Specify whether the logo belongs on the chest, back or sleeve. If you need individual names as well, provide each spelling and placement. Keep instructions consistent across the order, and note any garment-specific exceptions.
For standard-logo orders, advertised print bundles include printing, setup and shipping. The price depends on the case and is given after a quote request; order quantity, shirt type, artwork and decoration details affect the cost. Bundle pricing and minimum quantities are separate considerations, so compare the required order size with your team’s actual needs.
Most repeat custom orders ship within 7-14 business days, while a new design takes additional time. Build the design stage into your schedule before relying on a repeat-order timeframe. Rush orders and expedited shipping are available for urgent schedules, and the requested delivery date helps set the order plan.
Reflective shirts with custom names and logos
A team logo and individual names can make work shirts easier to identify. Choose decoration that keeps reflective areas visible and the design legible.
Logo Decoration Methods
Screen printing, heat-transfer printing and embroidery provide different ways to add names or company logos. Screen printing can reproduce designs in up to four colours. Heat transfer can suit detailed artwork and individual names. Embroidery creates stitched lettering or a logo, but placement and size matter on reflective garments.
Start with the garment colour, then choose artwork that contrasts with it. White logos or text can be hard to see on lime, white or other light-coloured garments; black designs may disappear against darker garments. Keep names and logos clear of reflective bands, and specify each location in your artwork instructions.
For a company logo, provide a clear design file and note its colours, size and position. For team names, confirm the spelling and indicate whether they belong on the chest, back or sleeve. A consistent layout gives the shirts a unified look, while individual names help distinguish team members. Review a visual proof to catch colour or placement errors before production.
Certification and Visibility Considerations
Yes. Decoration can affect a garment’s certification or visibility compliance if it covers reflective material or changes the garment’s configuration. Keep designs clear of reflective bands and preserve the garment’s visible areas. For example, place a chest logo where it won’t overlap a reflective strip. Don’t assume a decorated garment retains its original certification; check its specifications.
Decoration should remain readable without competing with reflective trim. A large back design may use space needed for visibility, while a smaller chest mark may leave more reflective material uncovered. Check the logo position against the shirt layout before approving production. The garment’s intended use and design determine suitable placement.
Follow the garment’s care label for washing and maintenance. After washing, inspect reflective sections for peeling, cracking or other visible changes. Care instructions can vary by material and decoration, so don’t apply guidance from a different shirt. Keep the label’s instructions with the team’s uniform information so everyone can follow them.
Before approving an order, use this short review:
- Compare logo and text colours with the shirt colour.
- Mark logo, name and sleeve positions on the artwork proof.
- Check that reflective bands remain uncovered.
- Read the care label before setting a washing routine.
If your team also needs standard branded apparel, review screen-printed T-shirts as a separate option.
High-visibility workwear categories
Shirt choice depends on the task, site conditions and required garment configuration. In Canada, no single shirt colour, reflective tape pattern or class suits every job. Match the garment to the worksite’s visibility requirements, rather than relying on job title alone.
Two examples show how categories differ: a Class 3 Type R shirt is described as long-sleeved, while a Class 2 Type R shirt is short-sleeved. These labels identify specific garment configurations, not a universal choice for every worker. Confirm the class required for the task before selecting a shirt.
Workwear choices can also depend on sleeve length and season. A short-sleeved shirt may suit warm conditions, while a long-sleeved option provides more coverage in cooler weather. For changing conditions, plan a garment system for the workday, such as a shirt under a compatible outer layer. Make sure the combination still meets site visibility requirements.
- Short-sleeved shirts: Consider for warmer work conditions; compare the required class and reflective layout.
- Long-sleeved shirts: Consider when extra arm coverage suits the task or season.
- Layering: Check that an outer garment won’t cover reflective material on the shirt.
Seasonal planning involves more than temperature. Rain, reduced daylight and changing work locations can affect which garment configuration suits a shift. A team moving between indoor and outdoor tasks, for example, should consider how outer layers affect the shirt’s visible areas. Choose the shirt and layers together, not as separate purchases.
Colour and tape layout also matter. Lime and white are examples of light garment colours, so choose logo colours that contrast with the fabric. Compare reflective tape placement with the areas that must remain visible, including the front, back and sleeves. A particular colour or tape pattern alone doesn’t prove that a garment meets worksite requirements.
Related high-visibility workwear may include vests and outer layers worn with shirts. Before adding a layer, check whether it covers the shirt’s reflective bands or changes the visible layout. Lay the shirt and layer together, then inspect the front, back and sleeves to spot covered areas before the team wears the combination on site.
For a team order, record the task, required class, sleeve preference, colour and layering plan. Then compare each candidate garment against those details. A Class 3 Type R long-sleeved shirt and a Class 2 Type R short-sleeved shirt are distinct examples, so selecting by category first helps narrow the options without assuming one configuration suits every Canadian workplace.
Canadian jobs do not all call for the same shirt colour, reflective pattern or garment class; select these according to the task and the worksite’s visibility requirements. Lime and white are colour examples, and Class 3 Type R is described as long-sleeved while Class 2 Type R is short-sleeved, but neither colour nor configuration is universal.
Print and embroidery options
Safety short-sleeve shirts can be screen printed or embroidered. Heat-transfer printing or embroidery can also suit smaller runs. Choose a method based on the logo artwork, garment layout and order size.
Screen printing applies ink to a shirt to reproduce a company logo. It can reproduce designs in up to four colours, making it suitable for artwork with distinct colour blocks. A simple one-colour mark, for example, keeps the design straightforward. Check that the logo colours contrast with the garment and don’t cover reflective material.
Heat-transfer printing applies a prepared design to the garment. It can suit smaller safety-shirt runs, including orders that need names alongside a company logo. Heat-transfer decoration is offered with no setup charges. Prepare one artwork file for the logo and a name list with accurate spelling. Then review each placement, such as the chest logo and individual name on the opposite side.
Logo embroidery uses thread to create a stitched mark on a shirt. It can also suit smaller runs. Consider the artwork’s detail and intended location before choosing embroidery. A compact company mark may be easier to position than a large, detailed design. Keep stitching clear of reflective bands, and review the garment layout before approving decoration.
Flat embroidery lays stitched thread directly against the garment rather than building a raised design. It can suit lettering or a simple logo when you want a neat, stitched appearance. For example, a team name can sit alongside a smaller company mark. Provide clear artwork, confirm the thread colours and specify the placement. Keep stitched details off reflective sections.
Use these steps to narrow the method:
- Check the artwork: Count its colours and note whether it includes fine details or text.
- Consider the order: Heat transfer or embroidery can accommodate smaller runs.
- Choose placement: Mark chest, back or sleeve positions on the layout.
- Protect visibility: Keep printed or stitched designs away from reflective bands.
- Review the proof: Confirm spelling, colours and placement before production.
For a simple multicolour logo, screen printing is one option. For individual names or a smaller run, heat transfer or embroidery may suit the order better. Compare the artwork with the garment, then choose a method that leaves reflective areas visible and names legible.
Custom high-visibility work shirts
For Canadian jobs, use CSA Z96 class guidance and site requirements to select the garment configuration. Class 2 Type R short-sleeve and Class 3 Type R long-sleeve shirts are distinct options. The best choice depends on the task, visibility layout and logo method. Canadian businesses can source options through local uniform suppliers or Canadian online retailers.
Applicable Safety Standards and CSA Classes
CSA Z96 is a key reference when considering high-visibility apparel in Canada. Select the class and garment configuration against the worksite’s requirements, not simply the job title. Market options include Class 2 Type R short-sleeve and Class 3 Type R long-sleeve shirts. These examples differ in sleeve coverage and class, so don’t treat them as interchangeable.
Before choosing a shirt, identify the work environment and required visibility configuration. Compare the shirt’s colour, reflective layout and sleeves with those requirements. A custom logo should not obscure reflective areas or change how the garment is worn. Keep the garment information at hand when reviewing the decorated layout.
Choosing Custom-Logo Shirts
For custom-logo shirts, assess the garment and artwork together. Check the shirt colour, reflective bands, sleeve length and logo placement. A chest logo may leave more of the back clear, while a large back design needs careful placement around reflective material. Confirm name spellings and use a consistent position across the team.
Choose a decoration method that suits the artwork. Screen printing can reproduce designs in up to four colours, while heat transfer or embroidery can suit smaller safety-shirt runs. A simple one-colour company mark may work well as a print, with individual names added separately. Review a proof for colour, position and legibility.
Canadian Supplier and Retailer Options
Canadian businesses can look to local uniform suppliers and Canadian online retailers for custom-logo high-visibility shirts. A local supplier may support discussion of garment choices and artwork layout. An online retailer can present product and decoration details for comparison. In either case, compare the listed class, sleeve style, reflective layout and printing or embroidery options.
Prepare the same order details before comparing options: garment class, shirt style, quantities, logo artwork and placement. This makes product comparisons more useful than judging by colour or price alone. For example, confirm that a short-sleeve Class 2 Type R option matches the intended worksite requirements before comparing it with a long-sleeve Class 3 Type R shirt.
To plan branded apparel for your team, explore custom apparel options and organize your artwork, garment requirements and logo placement together.
A1 Promotions Ltd.: Screen Printed T-Shirts
A1 Promotions Ltd. can help teams coordinate branded apparel through Screen Printed T-Shirts and Embroidered Polos and Jackets. These options suit businesses planning additional branded clothing alongside their workwear. Custom Headwear can also carry a team identity, while Trophies and Medals can support recognition at company or team events.
For a cohesive order, prepare your logo artwork, preferred colours and placement notes before discussing apparel. Keep high-visibility garment requirements separate from decisions about complementary branded items, so each serves its intended purpose. Screen printing and embroidery offer different ways to decorate apparel.
To discuss branded apparel for your team, contact A1 Promotions Ltd.
Plan the next step for your team
Use your uniform plan to create a consistent team identity without letting branding replace workplace safety requirements. Choose a high-visibility garment suitable for its worksite, then consider how other apparel can support the same look. High-visibility work shirts with a custom logo can be part of a broader branded uniform, rather than carrying every element of the team’s identity on one garment.
A1 Promotions Ltd. offers Screen Printed T-Shirts, Embroidered Polos and Jackets, and Custom Headwear. These options can help coordinate branded apparel for different roles or settings. Bring your artwork and a clear idea of how your team wants its branding applied when discussing the next order.
Contact A1 Promotions Ltd. about custom shirts to discuss branded apparel for your team. A practical plan can make the next uniform decision easier to organize.
Frequently Asked Questions
Can I get a sample of the product before placing a larger order?
Yes, a sample can help you assess the garment and decoration before ordering for a crew. Allow time for sample production and shipping, and include any sample fees in your planning. Use the sample to assess fit, colour, fabric and logo placement. If several shirt styles are under consideration, compare samples in the same size and review how each design sits on the garment.
What is the minimum order quantity for safety shirts?
The minimum depends on the shirt and print option. A standard minimum for screen-printed safety shirts is 24 pieces. A one-colour print bundle has a 25-item minimum for Class 3 Type R long-sleeve shirts and a 50-item minimum for Class 2 Type R short-sleeve shirts. Treat these as separate order configurations. Count sizes across the crew, then compare the total with the minimum for your chosen shirt.
What is the turnaround time for custom orders?
Order timing depends on whether the artwork is new or a repeat design, as well as production and shipping. New artwork needs additional preparation. To plan a crew rollout, prepare the logo file, garment choice, size breakdown and placement notes together. This can help reduce avoidable design revisions. Include your required in-hand date when organizing the schedule.
How much do custom-logo high-visibility work shirts cost in Canada?
Cost depends on garment choice, order volume and decoration details. For example, screen-print pricing can vary with the number of colours, while embroidery costs can reflect stitch count. Ask for a quote based on the exact shirt, artwork and quantities your crew needs. Pricing on the website is being updated. Please call +1 (604) 763‑1500 for accurate pricing.
What logo customization methods are available for hi-vis work shirts, and which are most durable?
Options include screen printing, heat-transfer decoration and embroidery. Screen printing can reproduce designs in up to four colours; embroidery creates a stitched design, while heat transfer applies a prepared graphic. No method is automatically the most durable for every shirt. Consider the fabric, design detail and care instructions. Keep decoration clear of reflective areas on high-visibility work shirts with a custom logo.
How should employers choose the right sizes, fit, and high-visibility shirts for a crew?
Start with the garment class and sleeve style required for the work, then use the garment’s size chart to collect each worker’s measurements. Check whether the shirt needs to fit over a base layer or beneath outerwear. A winter crew, for example, may need room for layers, while a warm-weather team may prefer short sleeves. Keep each worker’s name with their size to organize distribution and avoid mix-ups.
What are the best high-visibility work shirts with custom logo printing in Canada?
Choose a shirt that matches your worksite’s required class, sleeve length and reflective layout. The Class 3 Type R long-sleeve and Class 2 Type R short-sleeve are distinct options; screen printing supports up to four colours, while heat transfer suits detailed logos and names. Keep the design clear of reflective bands.


